GROUNDGRABBA - Heavy Duty Ground Anchoring Solutions
Free shipping on orders over $100
0 Cart
Added to Cart
    You have items in your cart
    You have 1 item in your cart
      Total

      NEWS

      What Hole Diameter Do I Need For A GroundGrabba to Screw Through?

      What Hole Diameter Do I Need For A GroundGrabba to Screw Through?

      What Hole Diameter Do I Need For A GroundGrabba to Screw Through?

      We often get asked what size or diameter hole is needed for a GroundGrabba to pass through. We have two widths of GroundGrabba flights of the GR13 Model which covers the GroundGrabba Pro, Pro 1 and Pro II.


      You need a slightly smaller hole when talking about a thin material like sheet metal compared to a thicker material like timber. With thinner material like sheet metal, the GroundGrabba can wind through like a screw but with a thicker material you won't be able to do that.


      In timber, you'll need a 1” or 25 mm hole, for the flights of the Pro to go through. If that material is mounted or sitting on the ground, you could basically just drive your GroundGrabba Pro straight the way through.

      For the GroundGrabba Pro I and Pro II, you'll need a 1 3/8 inch or 35 mm hole, and then the flights will drive all the way through without obstruction.


      With the thinner materials like sheet metal, you can start off with a ¾” or 19 mm hole for the GroundGraba Pro, and it will screw through at an angle.

      The GroundGrabba Pro will also fit through larger holes too of course.

      Our GroundGrabba Lite is larger again. Although it can screw through a 1 3/8" hole (35mm) it is tight, so best use a hole larger 1 34" however, the GroundGrabba lite is not suited for holding down plate steel or timber.

      With the PRO I and PRO II through thin metal you'll need at least a 1” or 25mm hole to screw through.

      There is a challenge associated with a hole size larger than the Collar under the Hex Head size of 25mm. The diameter of the head and collar are very close to the same size as the hole and therefore can slip through.


      To prevent the collar of the Hex Head slipping through, we've created a special washer called the "HookWasher".


      To use the HookWasher, it's very easy. Just hold the HookWasher on a bit of an angle then slowly screw the flights of your GroundGrabba through the tear drop shape and then slide it up the shaft.

      How To Enlarge Your Easy Up Anchoring Holes

      How To Enlarge Your Easy Up Anchoring Holes

      When you take a close look at your easy up or pop up gazebos feet, you'll notice it has certain size holes. These are generic and made for the old fashioned tent stakes one would hammer in with a mallet or lump pound type hammer.

      In most circumstances you'll notice these holes will be too small in diameter for your GroundGrabbas to screw into the ground through. Try it first to make sure and see for yourself if your GroundGrabba screw-in drill-in stakes can or cannot screw through those holes.


      Now I'm going to tell you how I drilled out and enlarged the holes of my Ezy Up feet. In particular making the center hole larger to take it from a hole diameter of around 1/2” or 12mm where GroundGrabba won't go through to 1” or 25mm where it will screw through.


      The holes of the feet of our Easy Up Gazebo were too small for the threads and the flights to screw through. So let me explain to you how I drilled the holes of our Ezy Up Pop Up Garage a bit wide to 1” or 25mm for much greater ground holding ability in conjunction with our GroundGrabbas.


      Tools and Equipment you will need:

      1x (or 2 if you have them) Cordless or mains powered drill

      1” (25mm) for steel cutting hole saw

      1x (or 4x) Block of timber to place under the foot of the easy up whilst you drill

      2x (or 8x) Hex head screws of at least 1” in length

      1x Hex driver socket to drive the two Hex head screws into the timber to hold the foot in place whilst you drill

      Half Moon file to take sharp edges off the inner new hole

      Steel spray Primer paint

      Top coat finish color spray paint.

      Drop sheet/ protection ground covering to catch overspray

      1/ Set up your easy up or pop up gazebo

      2/ Leg #1, Place the timber block beneath the foot of your ezy Up or Pop-Up

      3/ Secure your socket driver into your drill

      4/ Determine which holes you will use to secure the foot of your easy up to the timber

      5/ Drive the Hex screws into the timber so the easy up foot is now steadfastly in place

      6/ Remove the hex driver from your drill and replace it with your 1” /25mm hole saw

      7/ Holding the drill with two hands line up the pilot drill bit of the hole saw to the center of the hole you are about to enlarge.

      8/ Press down so the drill bit tip dents into the timber and start drilling slowly until the teeth of the hole saw engage with the metal foot of your easy up

      9/ Holding the drill very stable and perpendicular drill at a slow speed so you don’t overheat and burn the teeth of your hole saw.

      10/ Once you have cut/drilled through the metal, withdraw your drill and hole saw from the new hole.

      11/ Remove the hole saw from your drill and replace it with the hex driver again.

      12/ Unscrew/ remove the two hex screws from the metal foot of the easy up.

      13/ Move the timber away from the hole

      14/ Using your half moon file, file the sharp edges and burrs off the hole inner so there are no sharp edges to injure yourself or someone else.

      15/ Place the drop sheet or overspray protection on the ground under the foot and wipe the foot clean of any filing residue or grease or grime ready for painting

      16/ Give the area around the hole a light dusting of metal primer both from the top and the bottom.

      17/ Wait for the primer paint to dry and repeat the process of priming it once or twice more.

      18/ Once finally dry, it is time for the top coats. Again a light coat is best and then repeat it once or twice more each time waiting for the previous coat to dry before applying another coat.


      Now to do the other legs. You could streamline your process by using four blocks of wood and eight screws so you just go from leg to leg methodically.


      Now that you've finished you’ll see how much easier it is to deploy your GroundGrabbas directly into the feet of your Easy Up without the need for adaptors.


      One thing though, the 1”hole is now very close to the same diameter as the collar under the Hex Head of your GroundGrabba. This means it is possible for the GroundGrabba head to slip through the new holes you’ve created. If the heads of the GroundGraba are off-set then it is not a problem. However if you want to be sure the heads won't slip through then you can use one of our HookWashers.

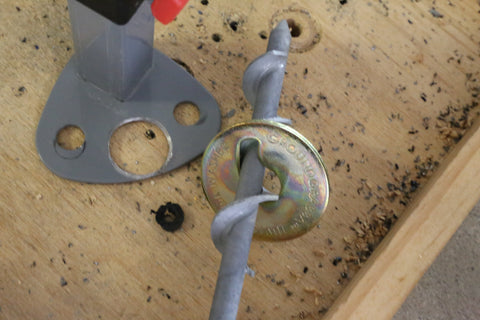
      You will need to hold the HookWasher on a little angle as you screw your GroundGrabba flights through the tear drop shaped hole. Once you’ve passed the flights you simply slide it up the shaft.

      Spring Tensioned Guy Ropes

      Now there's an alternative to just normal rope or ratchet straps to tie down your Easy Up, tarp, tent or shade canopy.

      The GroundGrabba spring tensions guy rope makes it quick, even easier AND gives the added protection of allowing some 'give' in a wind storm.

      To use the analogy of a hard oak tree snapping when the wind gets too strong compared to a reed that will bend.

      When the wind picks up the springs help maintain a constant tension on your equipment.

      The GroundGrabba Spring tensioned guy ropes have three integral components:

      1/ The carabiner at the top end of the rope.


      2/ The anodised aluminium adjuster handle.


      3/ The tensioning spring.

        To use the spring tensioned guy ropes you simply slip the free end of the spring onto the HexHook Pro then the carabiner end will either slip on the top of a tent pole or hitch around a strategic part of the shelter and clip it securely.

        Next pull up on the adjuster handle until you're happy wth the amount of tension on the rope and shelter.
        As the wind picks up and gusts you'll notice the spring tensioners compress and relax a little or a lot depending on how strong the wind is and the load.
        This helps reduce snapping forces and can maintain even tension to help reduce breakages or stakes being ripped out of the ground (which is less likely using GroundGrabba's).

        GroundGrabba camping tips: be ready for unexpected weather.

        6 Tips for Unexpected Weather on Your Camping Trip

        There are many types of campers. Those who are just trying it out for the first time, weekenders that enjoy it as an occasional pastime, and die hard, we go out as often as possible campers. One thing is true for all types: The weather can oftentimes be unpredictable. For each and every camper, it is always good to learn about, or be refreshed on tips for staying safe, dry, and comfortable while you are enjoying your time living in the outdoors. Read more
        GroundGrabba Ground Anchors are Perfect for the Overlanding Lifestyle

        GroundGrabba Ground Anchors: Perfect for the Overlanding Lifestyle

        If you are into overloading, then you know it is a lifestyle. It is an activity for the adventurous spirit, a step beyond camping and off roading. If you love traveling to remote locations in your all terrain vehicle and setting up in rarely explored regions, then GroundGrabba ground anchors are the perfect gear to take with you. Easily set up camp awnings and so much more with these versatile ground anchors. When the journey is the primary goal, then the set up at your destination should be efficient so that you can focus on expedition.  Read more
        For a Classic & Easy Breakfast, Bring Make Ahead Pancakes

        For a Classic & Easy Breakfast, Bring Make Ahead Pancakes

        Almost everyone loves pancakes. It may not be your first thought for a camping breakfast, but in reality, pancakes are an easy take-a-long for your next trip. Perfect for the kids and the grown-ups, this tasty breakfast will please everyone. The great thing is, that you can prepare all the dry ingredients and have them ready to go before you leave, so the preparation is quite simple!  So grab your skillet for your next camping trip and try this yummy recipe out!  Read more